When you’re running a serious marketing automation platform like Mautic, you quickly realize that out-of-the-box features are just the beginning. For us at Mailertizer, combining n8n, a powerful open-source workflow automation tool, with Mautic has completely transformed what’s possible.
By connecting the two, we unlocked powerful new abilities: capturing webhooks, firing off real-time events, manipulating Mautic’s API with ease, and even monitoring and automating system operations.
Let’s dive into how it works — and some real-world examples you can steal for your own projects.
Why n8n + Mautic Is Such a Game-Changer
Mautic is an incredible marketing engine — but it’s not designed to be a full workflow orchestrator or system automation tool. That’s where n8n shines.By combining them:
- Webhooks become superpowers: Capture external events and instantly trigger Mautic actions.
- Dynamic API manipulation: No-code/low-code updates to contacts, campaigns, segments, tags, and more.
- Real-time communication: Trigger SMS, email, or even Slack/Telegram notifications.
- System automation: Run Mautic cronjobs, system checks, and maintenance tasks dynamically through webhooks and n8n workflows.
And because both are open-source, you’re not locked into expensive SaaS products or closed ecosystems.
🛠️ Setting Up Manual Cronjob Execution in Mautic with Webhooks and n8n
Cronjobs are the backbone of Mautic — they handle everything from campaign triggers to email sends.But sometimes you need more flexibility than a static schedule. It can be very frustrating to have to wait 15 minutes before a segment is updated or a campaign is triggered.
What we did was use some custom plugins inside Mautic in order to make new menu items, combined this with forms, landing pages and webhooks in order to provide the flexibility to the end user to manually trigger cronjobs for single or multiple segment updates and/or campaign updates and triggers. This can actually be extended to clearing the cache as well, however we did not take it there.
Step 1: Install the Navigation Links Plugin
First, you’ll need to install the Navigation Links Plugin for Mautic.
This plugin allows you to add custom links directly inside your Mautic admin sidebar.
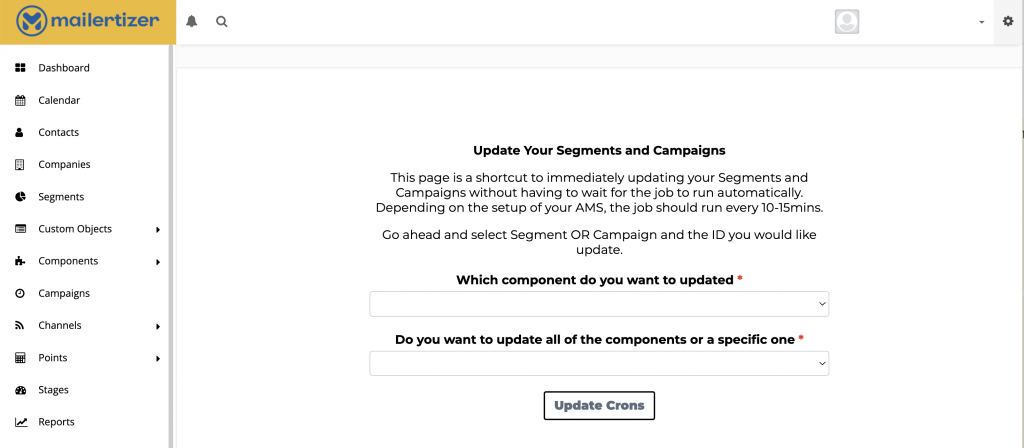
Step 2: Create the “Update Segments & Campaigns” Form
Head over to Forms and create a new form.
Name it: Update Segments & Campaigns
Add the following fields:
- Description Field
- Type: Description
- Purpose: Just for showing information at the top of the form.
- Which Component Do You Want to Update?
- Type: Select
- Options: Segments and Campaigns
- Do You Want to Update All or a Specific Component?
- Type: Select
- Options: All and Specific
- Specific Component ID (Conditional Field)
- Type: Number
- Only show this field when “Specific” is selected above.
Step 3: Create a Landing Page to Host the Form
Now you need to create a landing page to display your form:
In the landing page content, embed your form. Example shortcode:
{form id=YOUR_FORM_ID}
(Replace YOUR_FORM_ID with the actual ID of the form you just created.)
- Publish the page and copy the URL.
Step 4: Add a Navigation Link for Easy Access
Next, create a navigation link inside Mautic:
- Go to Settings → Navigation Links.
- Click Add New and fill it out:
- Location: Admin
- Order: -19
- Label: Run Cronjobs
- Icon: fas fa-retweet
- URL: Paste the URL of your landing page
- Nav Type: iFrame
Step 5: Clear Mautic Cache
After adding the new navigation link, clear your Mautic cache to make sure the link appears correctly.
(You can do this via command line or simply delete the /var/cache/ folder inside your Mautic directory.)
You should now see something like this inside your Mautic admin sidebar:
Step 6: Set Up the Webhook in Mautic
Now, let’s connect it to n8n:
- Go to Settings → Webhooks in Mautic.
- Add a new webhook:
- URL: The webhook URL from your n8n Webhook node
- Triggers: Form submission of your “Update Segments & Campaigns” form
This will push the form data into your n8n workflow whenever someone triggers it.
Step 7: Build Your n8n Workflow
Finally, create the actual automation inside n8n:
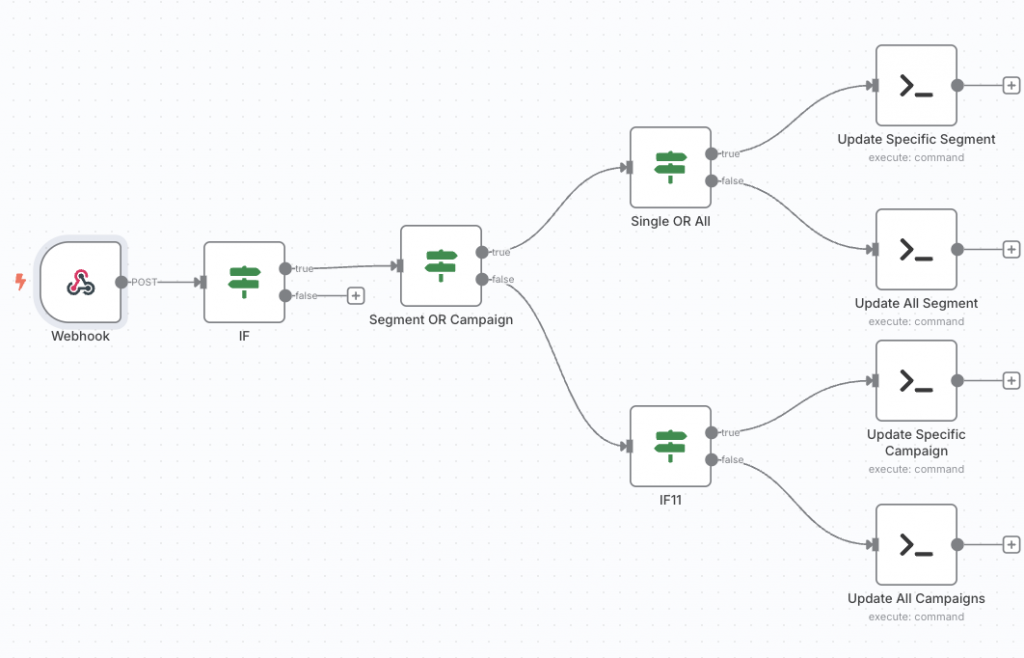
You can download the n8n json and easily import it. Click here to begin your download.
Final Thoughts: Mautic Alone Is Powerful — Together with n8n, It’s Unstoppable
Adding n8n into the mix doesn’t just automate Mautic — it supercharges your entire marketing operations.
From system health monitoring to dynamic campaign management, what you can build is limited only by your imagination (and a few clever API calls).
If you’re already running Mautic and want to take things to the next level, we strongly recommend setting up n8n alongside it.
It’s one of those moves that feels small but ends up changing everything.